Getting Started with Ubuntu

Bored of Windows or MacOS? Want more control over your operating system? Just don't like the look or feel anymore and want to try something new?
As of July 2021, Microsoft Windows has an estimated desktop operating system market share of just under 73%. That's almost 3/4 of the market running Windows! Apple MacOS is next in line with approximately 16% market share. That leaves just 11% of the desktop computer market not currently running Windows or MacOS.
While both of these operating systems (or OSs for short) have great benefits, and some not so great issues, each are still beloved, or hated, by many across the world. But with all the screen time of modern day living, sometimes having the same user experience over, and over, and over again, can become monotonous.
Well, believe it or not, it's actually pretty easy to change that. Yes, I'm talking about Linux. Now, before you go "not this again", hear me out. I understand the shortcomings of Linux as a desktop computer OS, as I have used it as a primary OS for many years. While companies like Valve are making great strides towards making Linux and gaming as synonymous as it is with Windows, it still isn't all the way there yet. Not to mention, that most Linux desktops are still a little confusing, and some down-right alien, to your average Windows or MacOS user.
In other areas, though, Linux really shines. As a whole, most Linux variants (called Distributions, or Distros for short), can function well while using much less system resources than Windows or MacOS. This makes it a great solution for someone with an aging computer that might want to extend the life just a little bit longer. Linux also offers substantially more control over the appearance, functionality, and design of your OS than either Windows or MacOS, mostly because it is community driven, and open source.
Ok, so now you're interested, right? You want to try this out for yourself. Well, one of the best Linux Distributions for beginners is Ubuntu. From the ease of installation, to the layout (which kind of feels like a cross between MacOS and Chrome OS), it is fairly straightforward to figure out, and setup. Ubuntu also has one of the largest user bases of any Linux Distribution, raking currently in 4th place for most used distribution. This means that support, community assistance, drivers, and software will all be more highly available.
So, how do we get started? First, let's head over to the Ubuntu website, and download the latest version. You will see two versions available, one is the LTS version (or Long Term Support) version, and the other (with the higher version number) is the very latest version. You can download either, but I would recommend the LTS version. It will be supported for 5 years after it's release (at the time of writing, this is version 20.04.2.0LTS, supported until April 2025), and will usually be a little more stable as it isn't quite as bleeding edge as the very latest version (which at this time is 21.04).

Once your download finishes, then you need to prepare for install. For the purposes of this guide, I will be installing to a VM (or virtual machine), if you aren't sure about what that is, read more about it here. Don't worry though, if you are wanting to install it to your own computer, I will include instructions for that as well.
PRE-INSTALLATION
PHYSICAL COMPUTER
NOTE: If you are planning to install to a virtual machine, skip ahead to the "Virtual Machine" section below.
Things you will need:
- USB Flash Drive (at least 4GB) (Will be erased for install!)
- Rufus (or similar boot disk creator) - Download Here
- Ubuntu ISO Image - Download Here
- A computer to install on (Will need about 10GB of free disk space)
- A working computer with Windows or MacOS to make the boot drive
Preparing to Install:
- Plug in your USB drive into a working system. If you are running Windows, we will be using Rufus to make the USB boot drive. If you are running MacOS, UNetbootin is a good alternative - Download Here. IMPORTANT: All data on your flash drive will be erased to make the installer, make sure you back up any important data prior to continuing!
- Open Rufus on your computer, Select the USB drive in the "Device" dropdown menu, and click "Select" next to the "Boot selection" dropdown. Browse to the Ubuntu ISO image that you downloaded earlier, and select it. Rufus should now look similar to this:
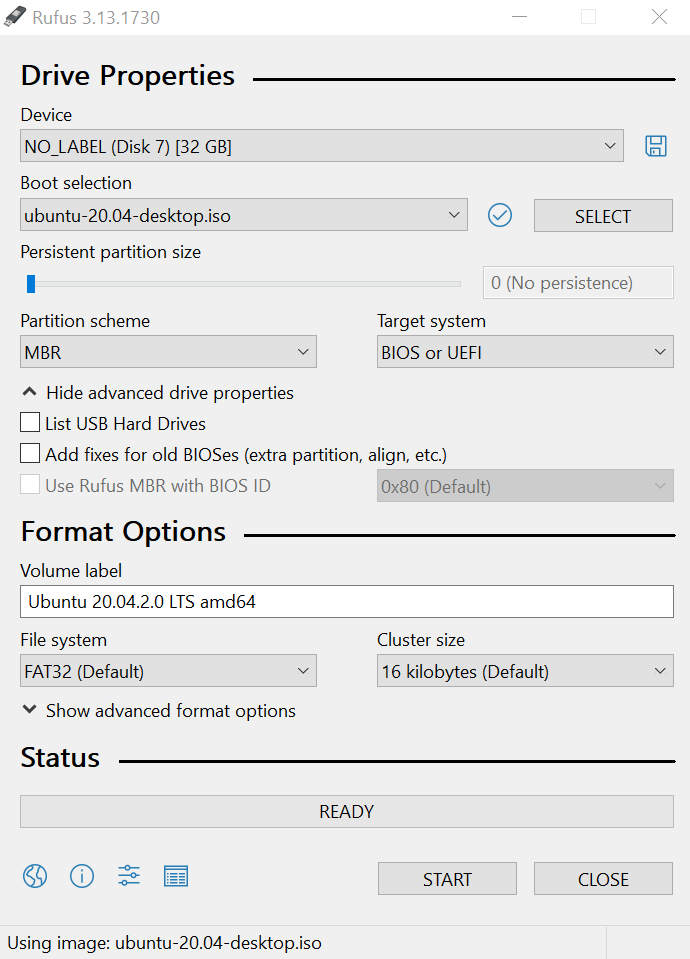
- You shouldn't need to change any other settings, just hit "START". You may get a "Download required" message, stating that Rufus needs to connect to the internet to download new versions of Syslinux. If that happens, just hit "YES". It will ask you if you want it to write in "ISO Image mode (recommended)", or "DD Image mode". Leave "ISO Image mode (recommended)" selected, and hit OK. It will then warn you that it is going to erase all data on the drive, if you are ok with that, hit "OK". It will then start writing the image to the USB drive.
- When the image is done writing, and Rufus is complete (status will change back to "READY"), remove the USB drive from the computer, and plug it into the computer that you want to install Ubuntu on.
- Before you turn the computer on, be prepared to try and get into the "Boot Menu". The boot menu is a special screen that is part of your computer's "BIOS" (the BIOS is a piece of firmware that controls how your computer operates. It determines things like which hard drive the computer boots from, how different options for your motherboard are configured, etc). We will use the boot menu to tell the computer not to attempt to boot from the hard drive, but from the USB drive that we have plugged in. Depending on your computer, and how fast it boots, you may be able to see a load screen when you first turn it on, with some text somewhere on the screen telling you which key to hit to get to the boot menu:
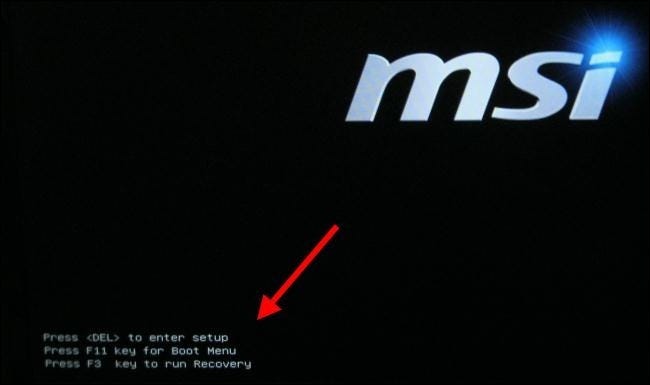
If your screen loads too fast for you to see this, you can try and find it on this list of common manufacturer hot keys, just look under the column "Boot Menu". - Once you know the key, you will need to press it before the system finishes loading the BIOS, and moves on to attempting to boot. The easiest way to do this is to shut the computer down, and immediately after hitting the power button, start rapidly pressing the key that opens the boot menu. Hopefully, if you are fast enough, you should be presented with a screen that looks like this (note: this will look different on different computers, you are basically just looking for a screen that lists a bunch of possible boot devices, usually there will be a hard drive in the list, your USB disk, and maybe a CD/DVD drive or a network boot option):
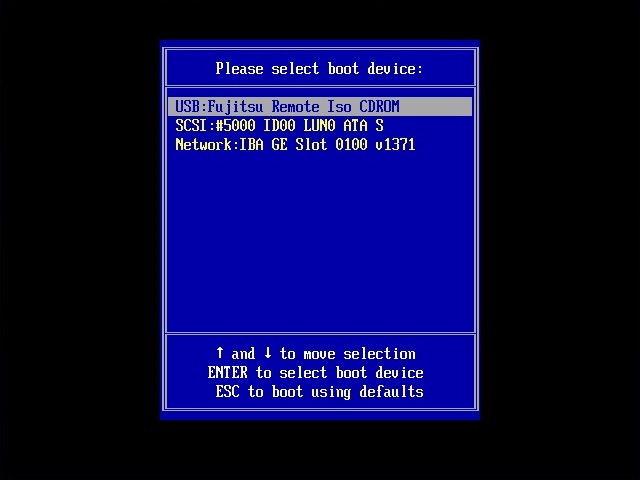
- Once you get to this screen, use the arrow keys on your keyboard to select the proper boot device. You are looking for the one labeled "USB", or if none mention "USB", look for the one matching the Make/Model of your USB drive. When you find it, select it with the arrow keys, and hit enter to start booting from it. If everything was successful, you should see something like this:
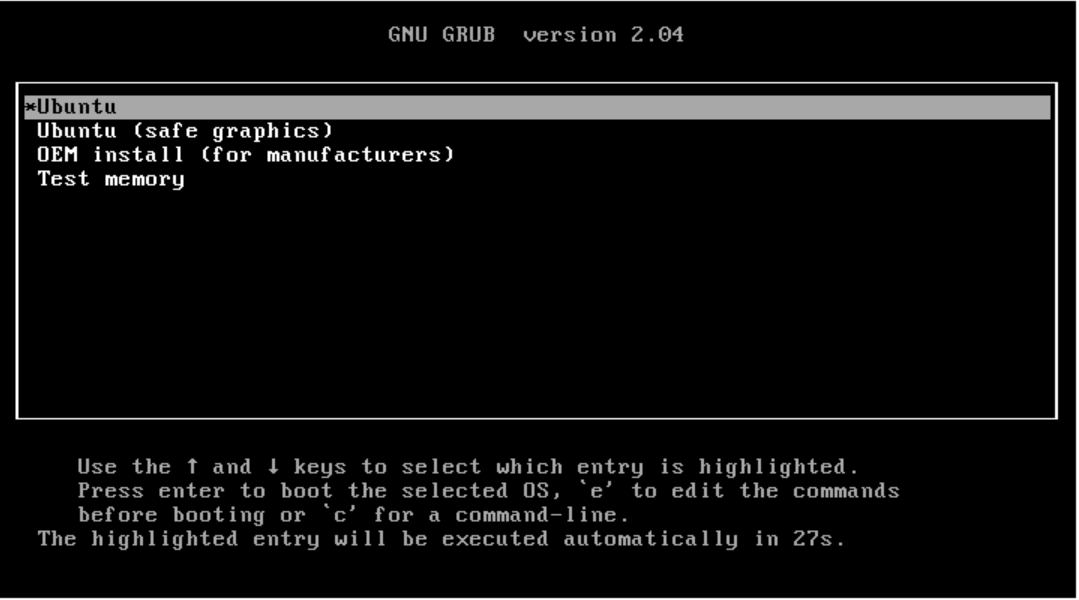
This is the "GRUB" boot loader, which is the piece of software that initiates the booting of the Ubuntu OS (and many other Linux OSs). You can either wait here for a few moments, and it will eventually automatically continue to the selected entry, or you can hit "Enter" to load into Ubuntu. Don't select any of the other options right now, they are for more advanced situations that we don't need. If you accidentally select a different option, hold the power button on your system until it shuts down, and start the process over from step 6. If it is successful, after a few moments (could take a few minutes depending on the computer), you should see this: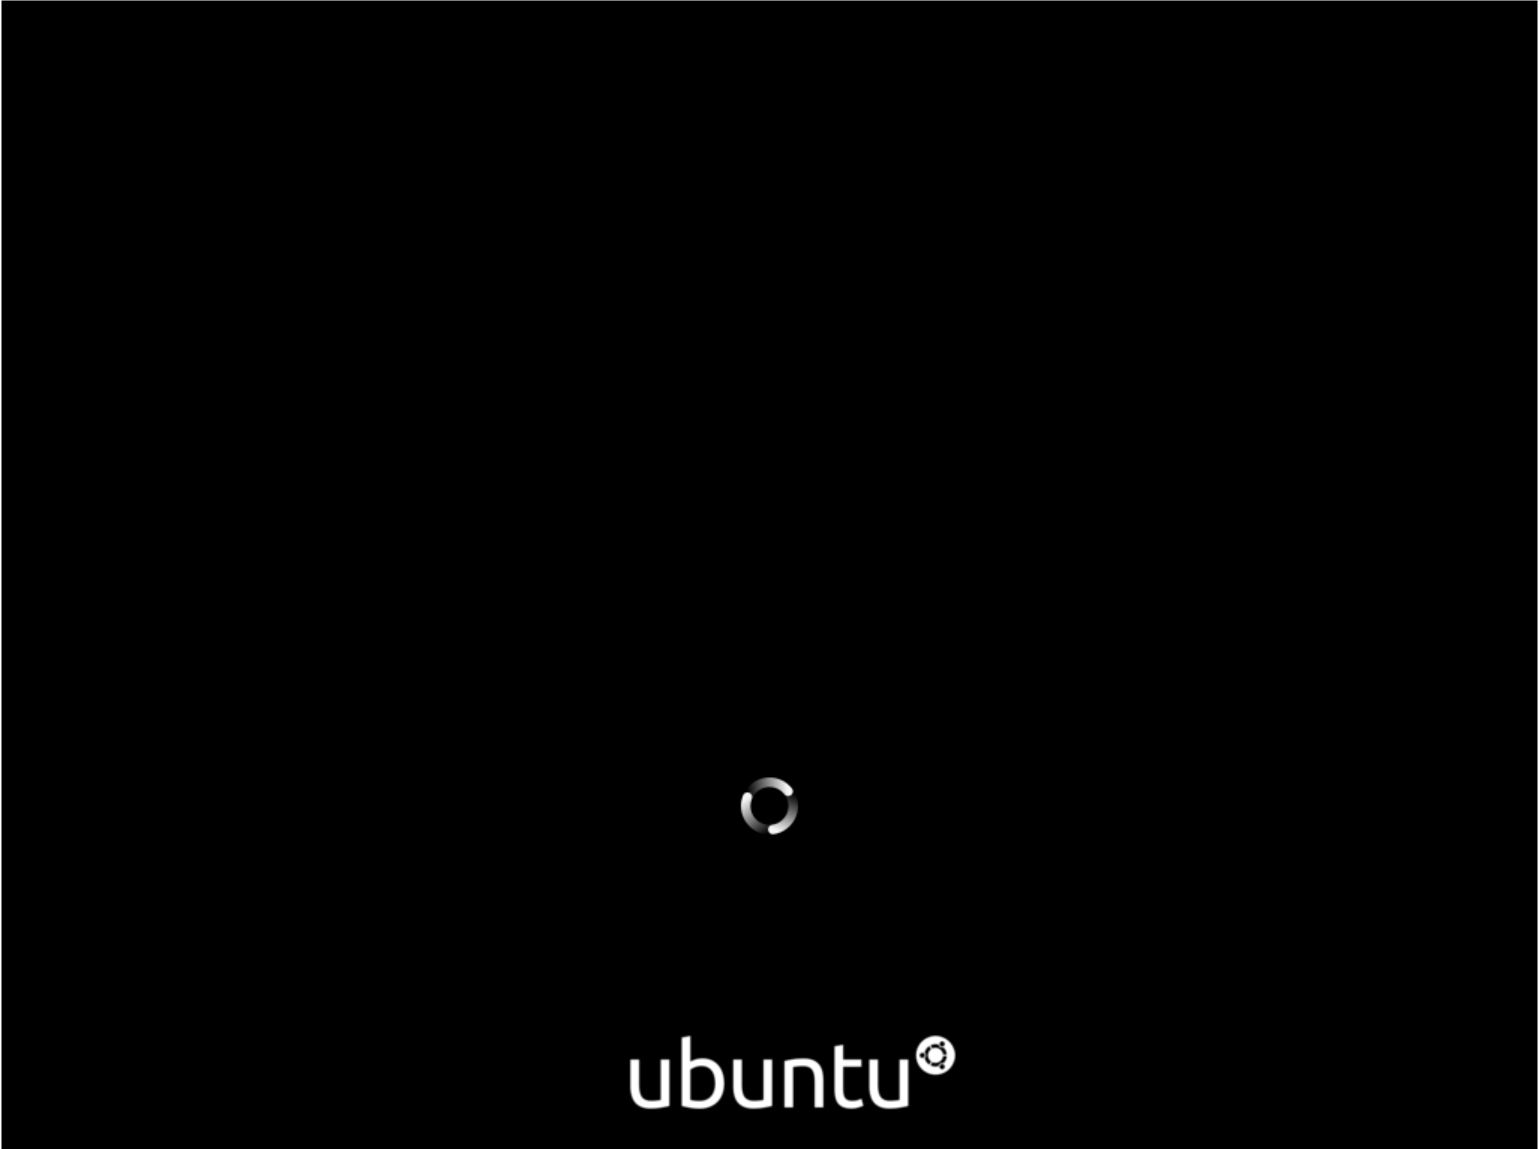
- Once you have made it into the Ubuntu install screen, skip ahead to the first step in the "START INSTALLING" section.
VIRTUAL MACHINE
Things you will need:
- Ubuntu ISO Image - Download Here.
- A Hypervisor (type 1 or 2) setup and ready. I will be using Oracle VM VirtualBox - Download Here.
- At least 10GB of free disk space on the hypervisor host system.
- At least 4GB of RAM on the hypervisor host system (Minimum 8 is preferable though).
- Preferably at least a dual core CPU on the hypervisor host system.
Preparing to Install:
- Open your hypervisor, I am using VirtualBox.
- Make a new VM (click on "New in VirtualBox"):
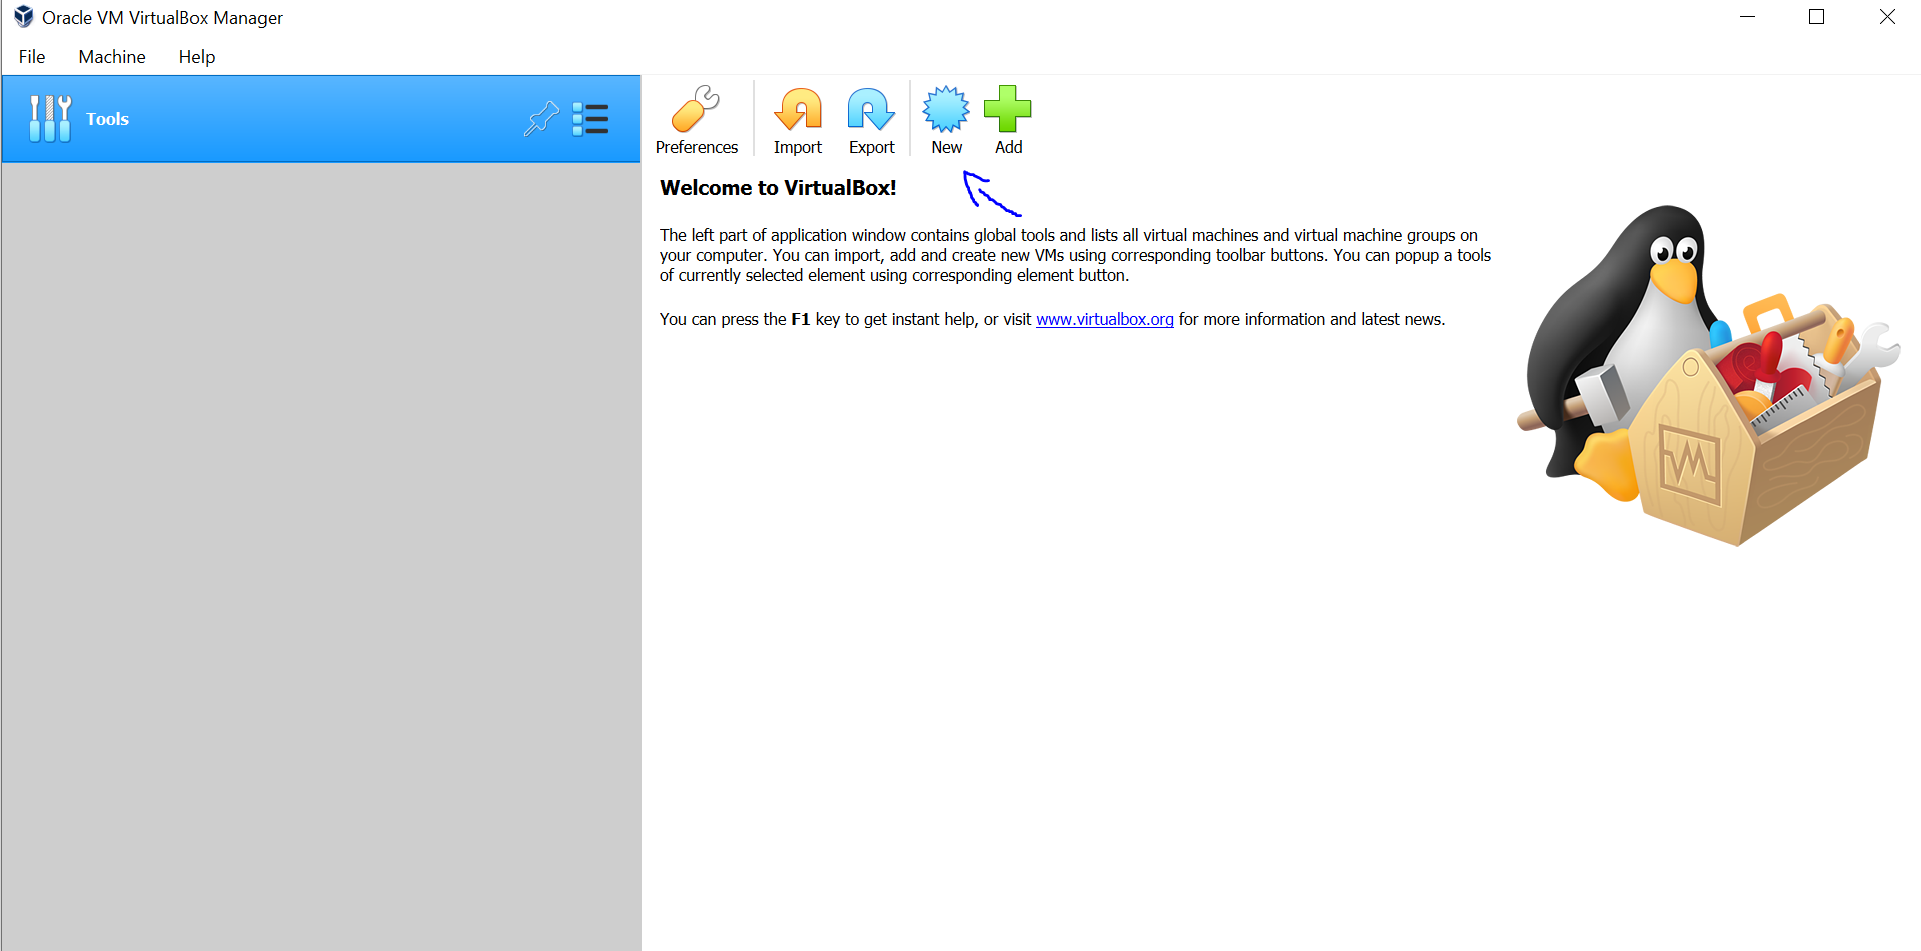
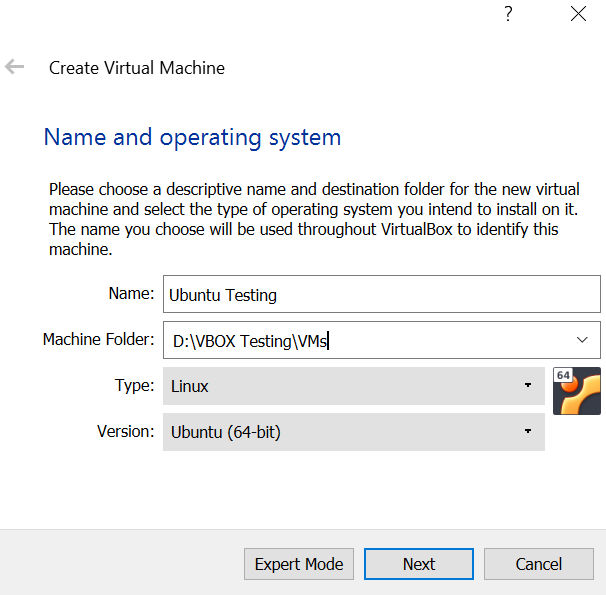
- In the window that appears, give your new VM whatever name you would like. I will call mine "Ubuntu Testing", choose the folder where you would like the software to store your VM files (this will be the configuration file for the VM settings, as well as the virtual hard disk files, so you will want this location to have enough space for the entire VM). Then, select which operating system type, and version (Linux, and Ubuntu 64 bit). Then click on "Next". HINT: If you use "Ubuntu" in the name, VirtualBox will often automatically select the OS type and version for you:
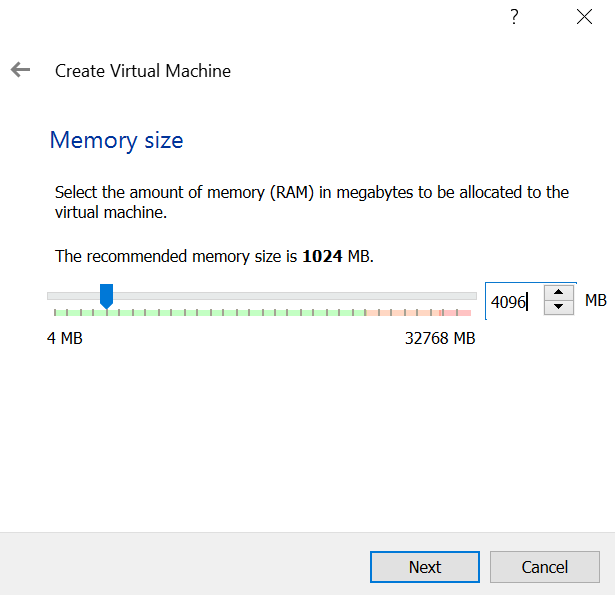
- On the next screen, choose how much RAM you would like to assign to your new VM. Be careful here, as you don't want to assign too much RAM and not leave enough for the host OS. A good rule of thumb is to leave at least 4GB for the host OS if at all possible (though you could probably get by with 2GB on the host if nothing else is running). So, for example, if you host system has 8GB total, you would probably want to assign 4GB to the VM for a good experience. I am going to assign 4GB to my VM (4096MB if you would prefer to type in the box rather than use the slider). If you need help calculating the RAM in MB, just take however many GB you would like, and multiply that number by 1024. So 2GB would be 2048MB. Once you have assigned your RAM, click on "Next":
- Now we will create our virtual hard disk. This is a file that the software will treat like a hard drive. It will be stored in the location that we picked earlier. Leave "Create a virtual hard disk now" selected, and click on "Next". On the next screen it will ask you which type of virtual hard disk file format you would like. This doesn't matter a whole bunch for our purposes of testing, but can be useful if wanting to transfer the VM to another Hypervisor software later. For now, we will just leave "VDI" selected, and click "Next". The next screen will ask how you want the virtual disk file to allocate space. There are two options, "Dynamically allocated", and "Fixed Size".
Dynamically allocated means that the disk file will start small, and as data is stored on it, the file will grow in size until it reaches the maximum configured size (we will chose the max size in the next step).
Fixed size means that the file will immediately become the maximum configured size on the disk, and will remain that size from the start.
There main reason for these options is performance. Dynamically allocated disks usually perform slower than fixed size disks, as they have to take time to grow as you add data, which in turn creates more I/O wait time on the physical disk that the file is on. The other difference is that you may be able to save a little space in the long run with a dynamically allocated disk, as it may never actually have enough data on it to grow to max size, whereas a fixed size disk will be max size all the time. One other difference is that Dynamically allocated disks are created much faster initially than fixed sized disks, as the host doesn't have to allocated all the hard drive space immediately upon creation.
For what we are doing, I am just going to use a Dynamically allocated disk, as performance doesn't really matter to me right now. You can choose either one, depending on what you want. Once you have made your decision, click "Next".
Now we need to chose our hard disk size. 10GB is kind of the bare minimum that you want for the OS, I usually go about 20GB, so that I have room to install some software, run some updates, etc. for testing purposes to really try out the OS (of course, if you are going to continue using this afterwards, you may want to allocate even more for regular use). Use the slider, or type the size you would like in the box. You can also select an alternate location for the virtual drive above, if you have decided that you would rather store it somewhere else. Once you have selected the location and size you would like, click on "Create".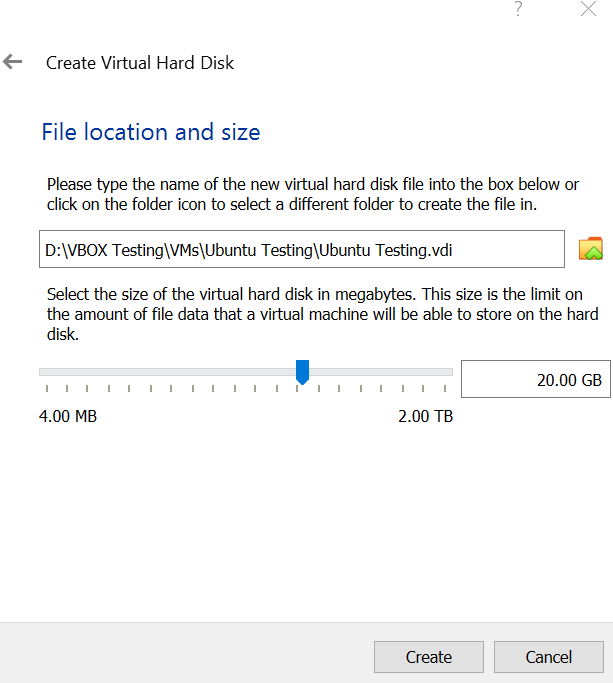
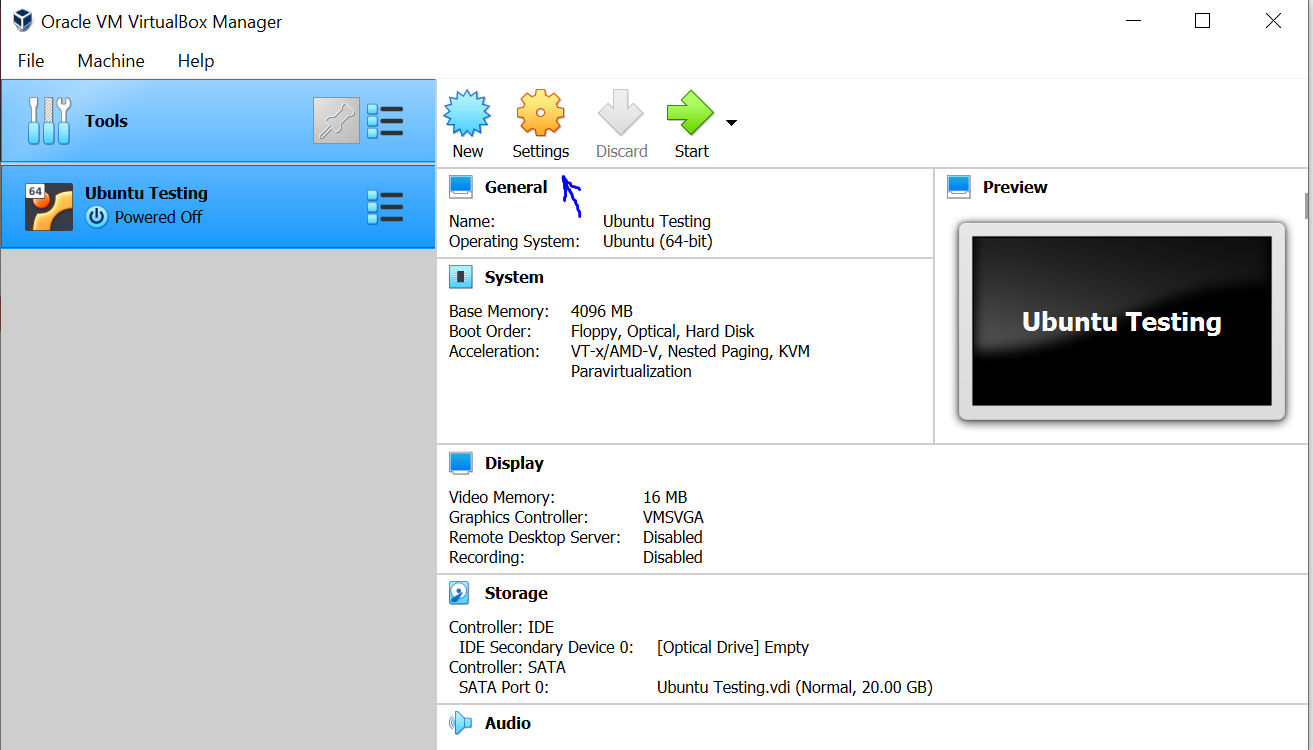
- After a couple seconds, or minutes (depending on type, and size chosen), you should be returned back to the main VirtualBox window, with a new VM listed. Don't start the new VM just yet, we still need to do a couple things. Click on the new VM on the left to make sure that it is selected, and then click on "Settings" to open the VM settings:
- In the settings window that opens, find "Storage" on the left side, and click on it. We need to add the Ubuntu ISO Image that we downloaded earlier as a CD/DVD image to boot from, so that we can install the OS. In the list of storage devices, click on the "Empty" CD/DVD device under the "Controller: IDE" section:
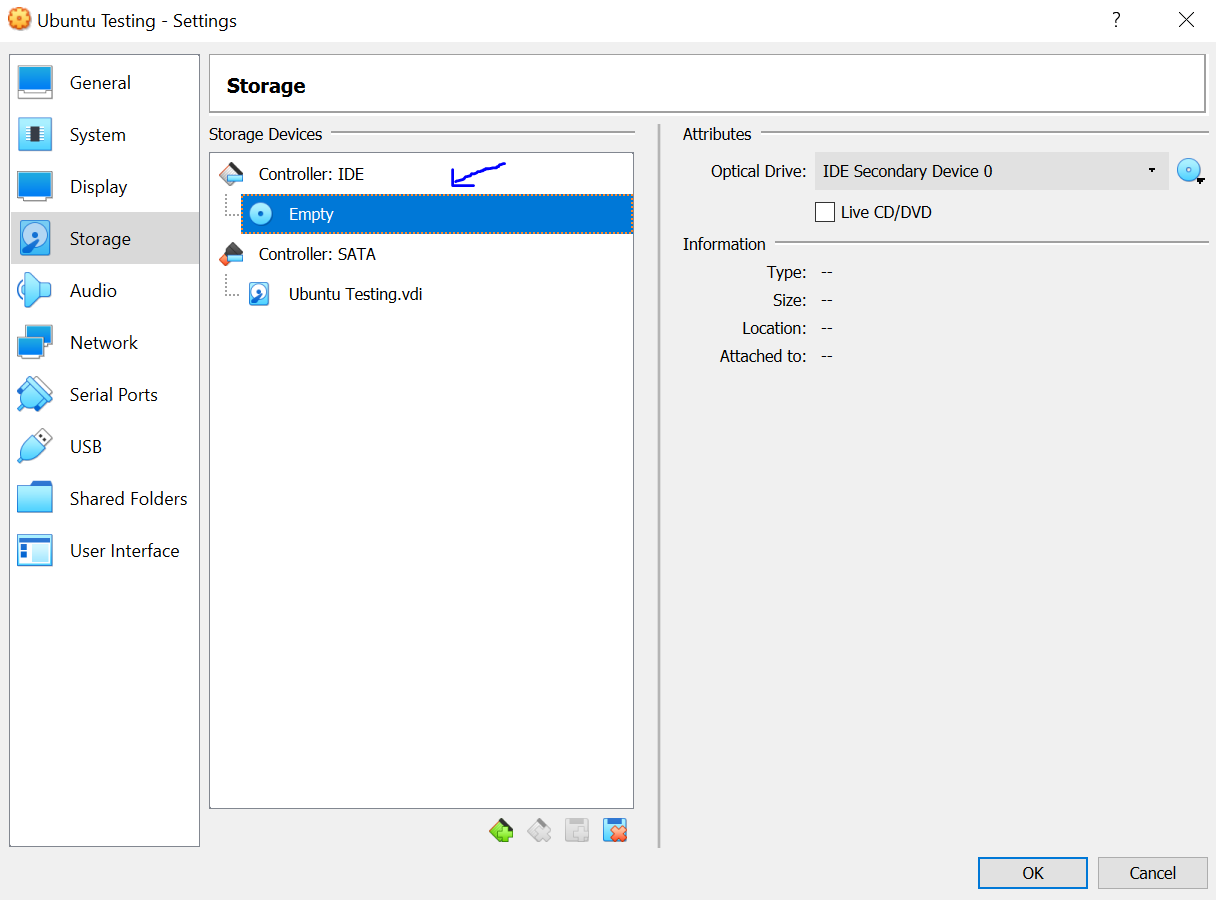
Then, in the right side window pane, next to the dropdown for "Optical Drive:", click on the little image of a disc, to get a dropdown menu: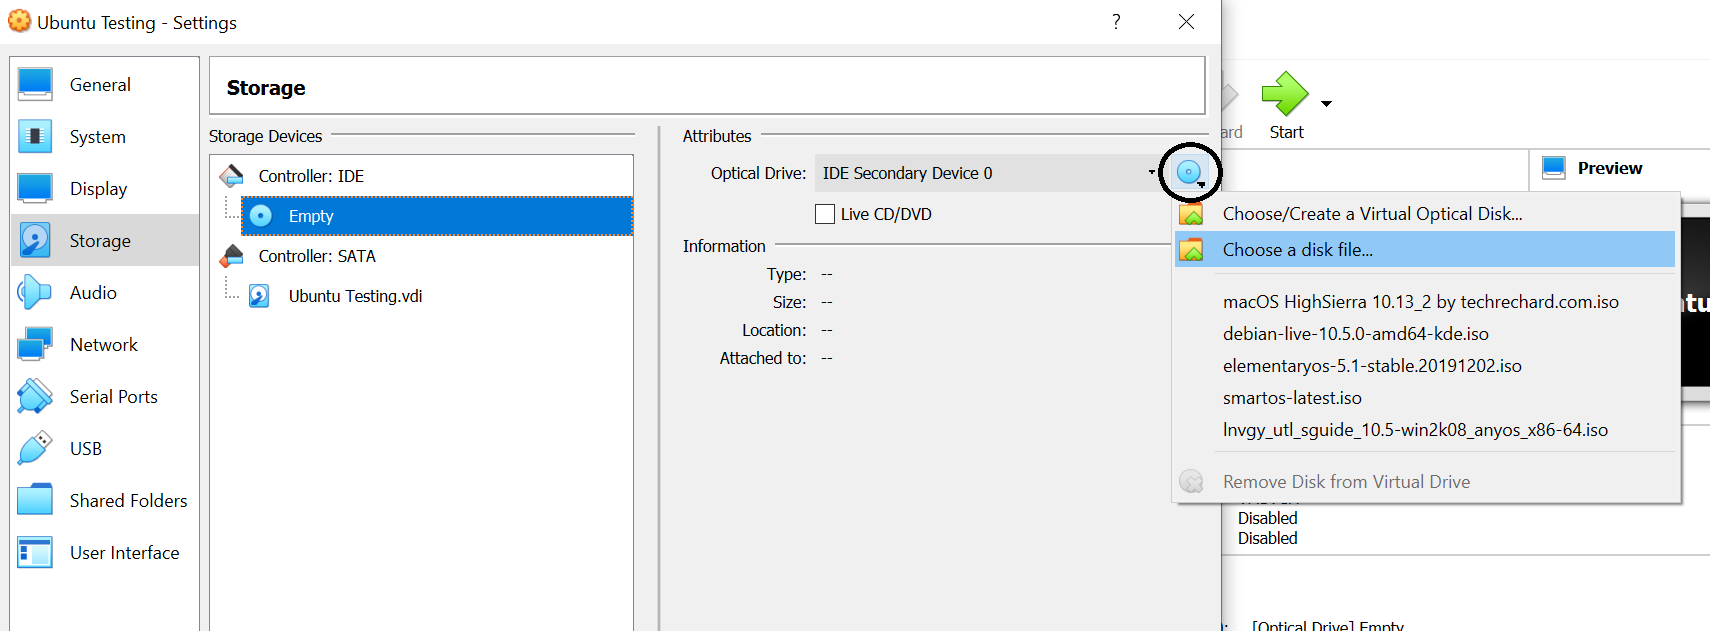
Select "Choose a disk file" from the dropdown menu, and browse to and select the Ubuntu ISO Image file that you downloaded earlier. If you did it correctly, your storage devices list should now look like this: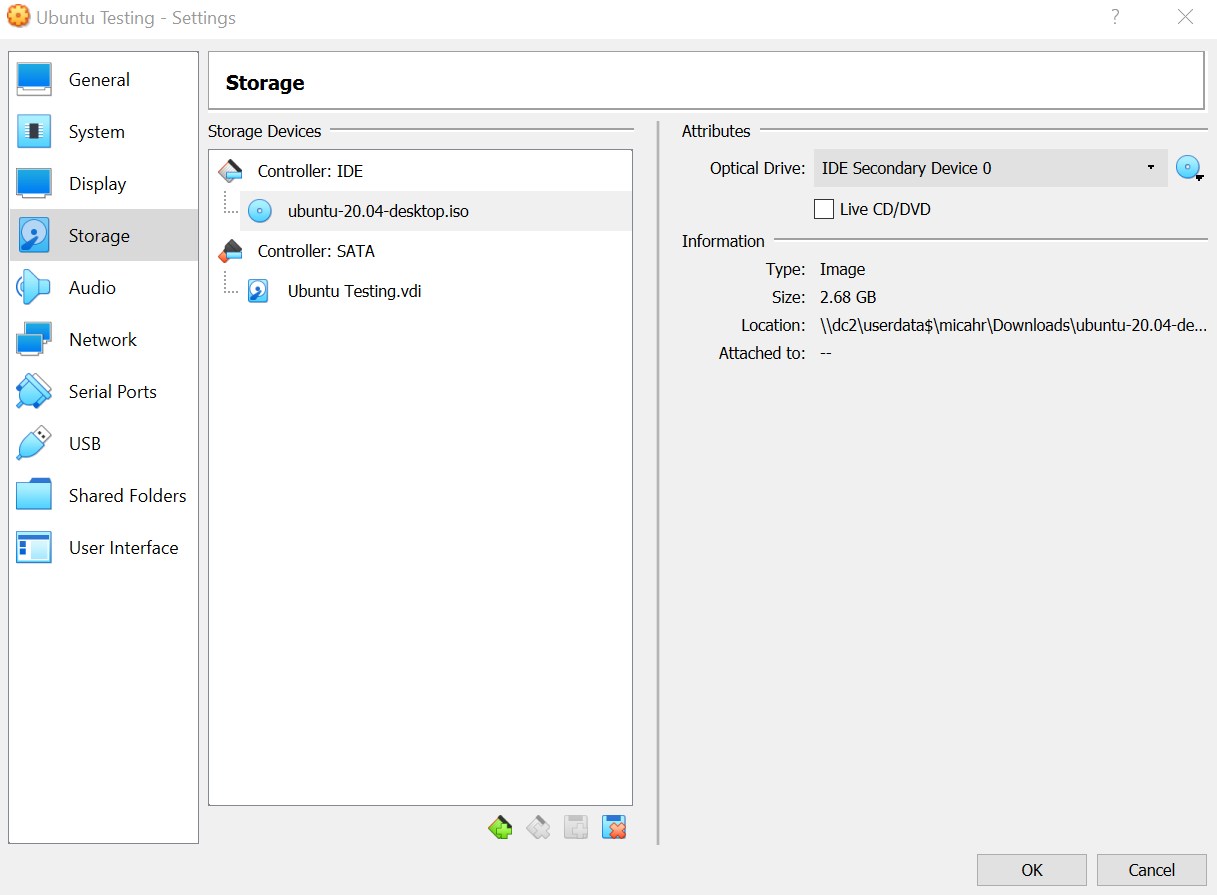
Click on "OK", to save the settings. - Click on "Start" to run the new VM, which should open a new window with the VM in it.
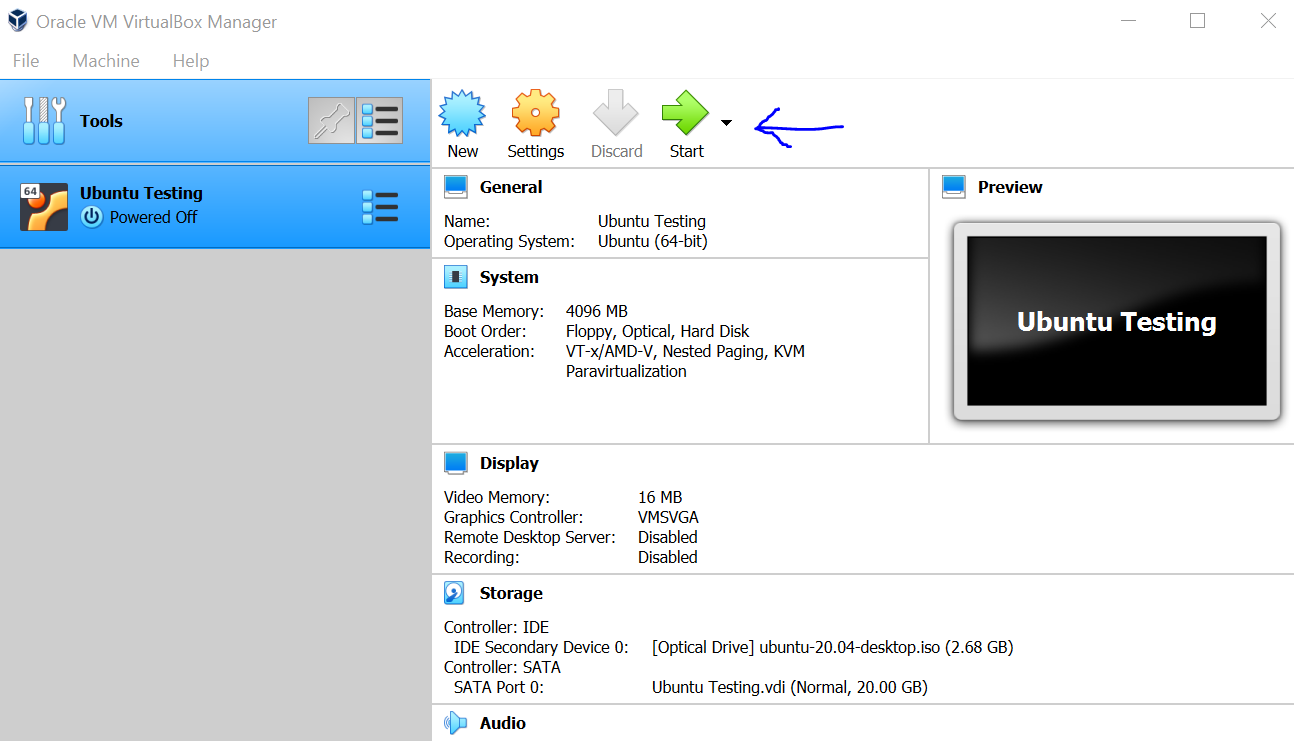
It will probably pop up a window asking to select the startup disk. The Ubuntu image that was inserted in the previous step should be selected, if not, select it from the dropdown menu, and click on "Start".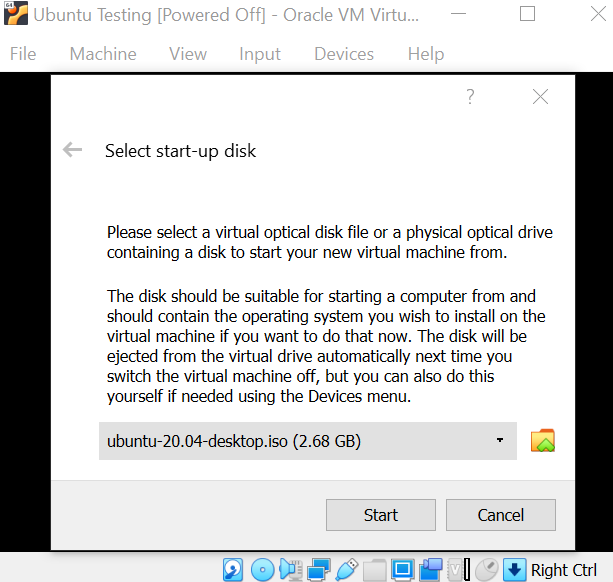
If everything goes well, you should be presented with this screen after a few moments:
- After a few moments, you should be presented with the Ubuntu Install/Welcome screen.
START INSTALLING:
- Now that you have made it to the Ubuntu Welcome/Install screen, we can begin the installation. There are a few options on this screen. You can choose your language on the left, and then select from "Try Ubuntu", or "Install Ubuntu" on the right.
Try Ubuntu will load you into a testing version of the OS that is running directly off of the installation media (either the USB drive if you did a physical installation, or the virtual CD/DVD drive if you did a virtual installation). This is just for demonstration or testing purposes, and doesn't actually install anything to your system. As such, any changes that you make are lost when you reboot.
Install Ubuntu will do exactly what it says, and will start the process to install the Ubuntu OS to your hard drive.
Choose "Install Ubuntu", and it will load the next screen: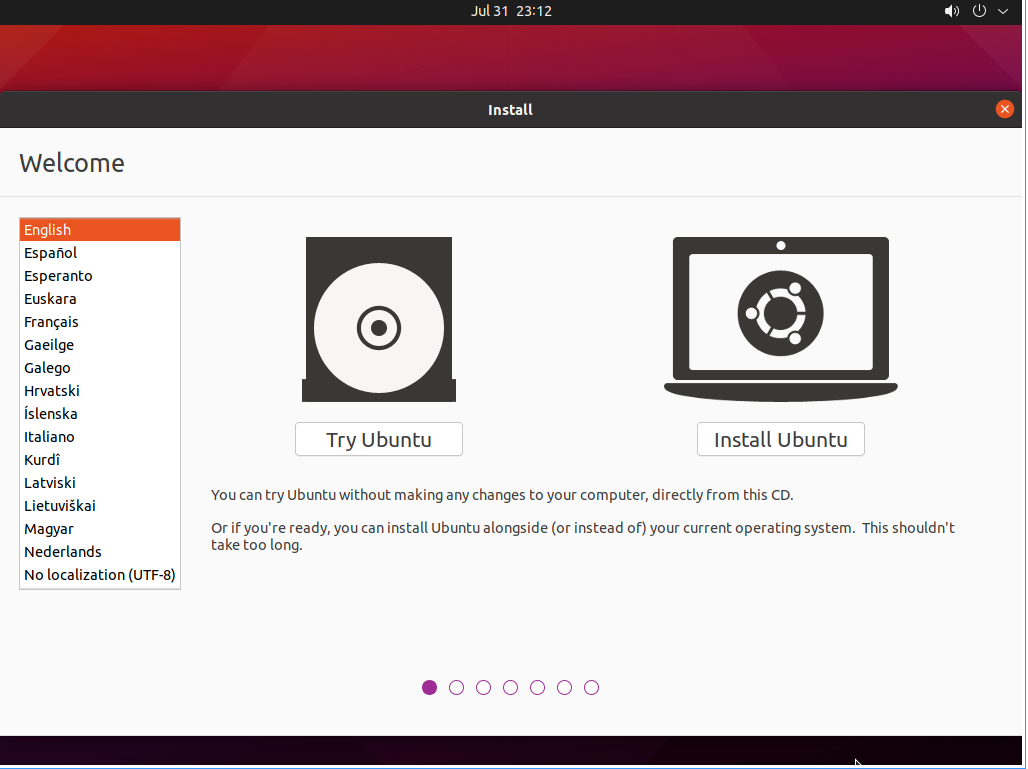
- Go through the next screen and choose your preferred keyboard type. If you are in the US, you probably want to use "English (US)" (which should be the default). Click on "Continue".
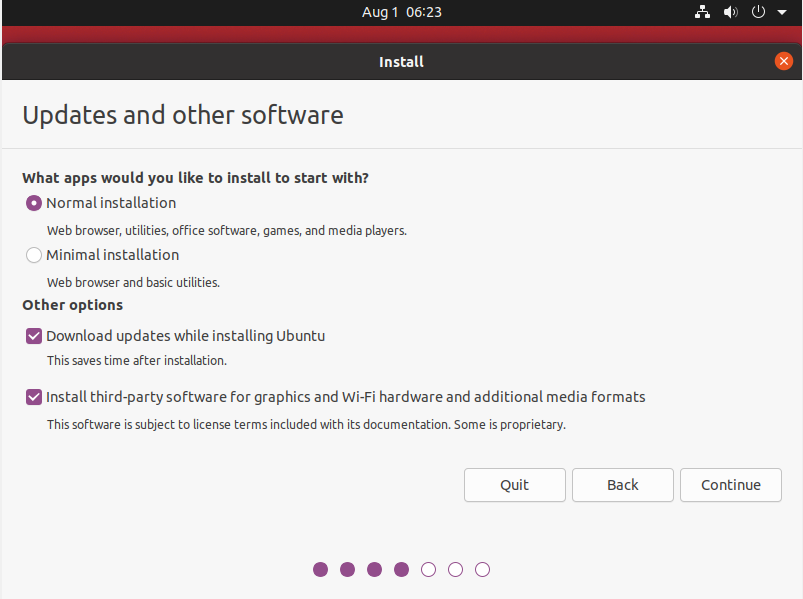
- On the next screen, leave "Normal Installation" selected. If you have connected your system to a network (this should happen automatically if you are doing the VM installation), you will want to also make sure that both "Download updates while installing Ubuntu", and "Install third-party software for graphics and Wi-Fi hardware and additional media formats" are selected. These are not requirements, but will make the experience smoother once the install is complete (these options will increase the install time, and speed is related to how fast your internet connection is). Once you have everything selected, click on "Continue".
- Now we will choose how to partition our disks. The easiest way to do this is to keep the default selected, which is "Erase disk and install Ubuntu". If you chose "Something Else", you will have to create the partitions yourself. For the purposes of this guide, we will not be discussing manual partitioning, but here is a guide to manual partitioning if you are interested. We don't need to choose any advanced features, these include things like using LVM partition mapping, or ZFS file system for Ubuntu. We will just keep the default, and click "Install Now":
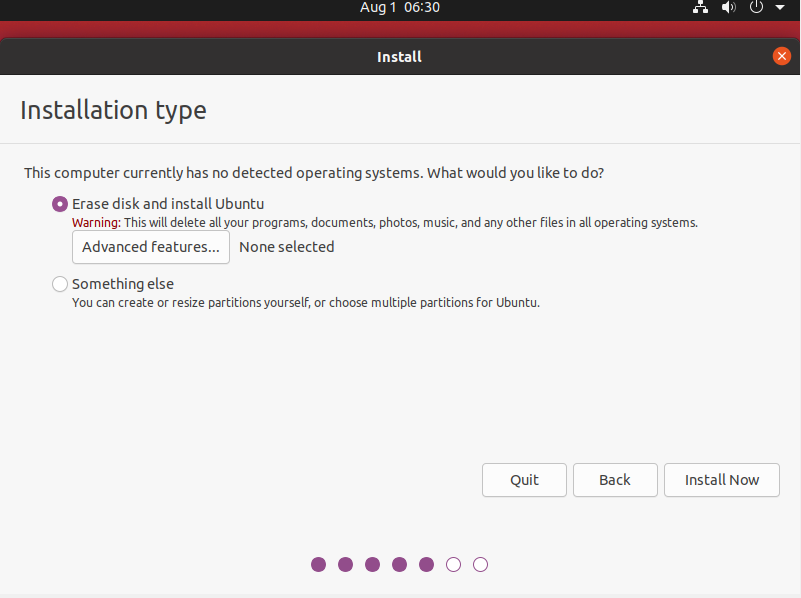
After clicking on "Install Now", a window will popup verifying the changes to the disk. If you kept the default option, this is just informing you that the entire hard drive will be erased, and that the listed partitions will be created on the hard disk for it to use to install Ubuntu. If you are ok with that, then click on "Continue" to proceed. NOTE: Make sure there isn't any information on the hard drive that you want to keep, as it will be erased! - Choose your time zone. If the wrong time zone is selected by default, type in the box and it will start producing results. The time zones are listed by central cities to that time zone. For instance, my time zone is Pacific Standard Time (PST), so I select "Los Angeles" as my time zone. When you are done, click "Continue".
- Now we need to setup our user account.
Enter in your name (Full name, E.G. John Smith) in the "Your Name" text box.
Then pick a name for your computer (only use letters, numbers, and dashes in this name. No spaces). Example: johns-laptop (try and keep the name short also).
Pick a username, this should be all lowercase, letters and numbers only. Example: johnsmith.
Choose a password, and then type it once more to confirm it. You can also choose whether or not you want the computer to sign you in automatically when it boot ("Log in automatically"), or if you want to be prompted for a password before sign in ("Require my password to log in").
When you have all of this information entered, click on "Continue".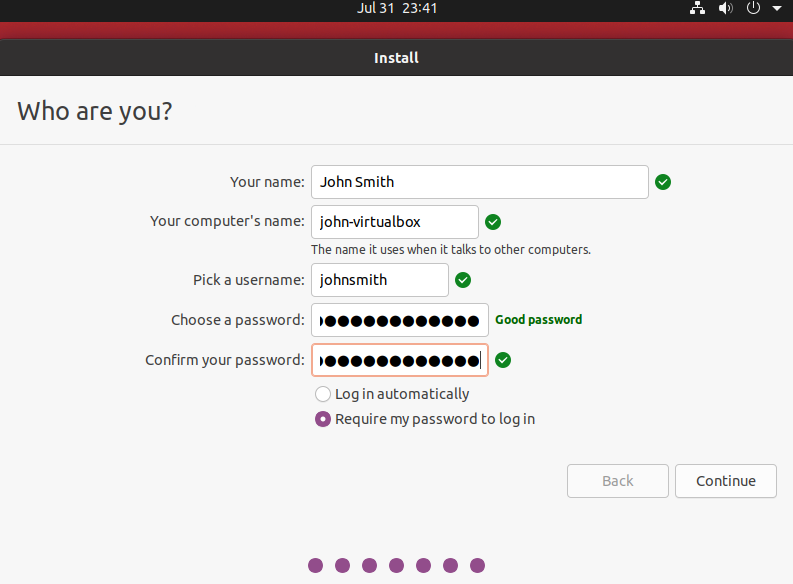
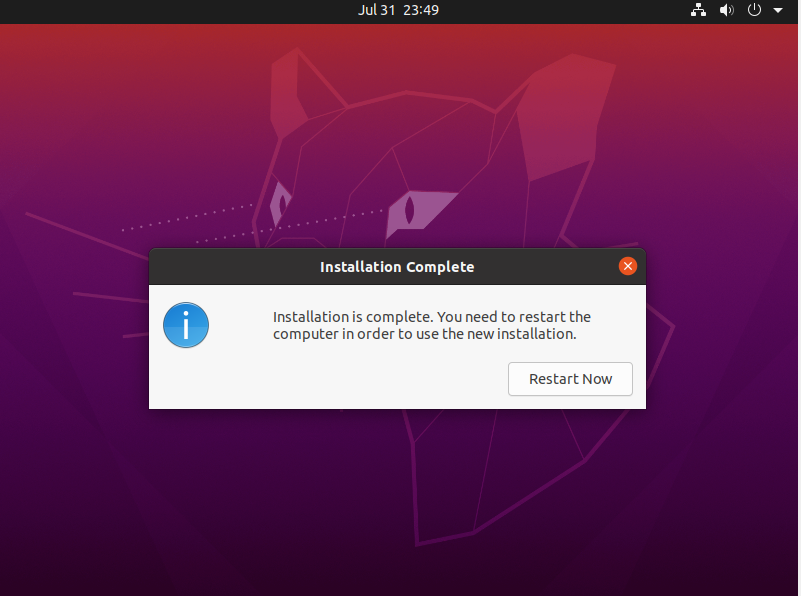
- Now just sit back and wait until the install is finished. Should take anywhere from 15 minutes to an hour, depending on options selected, hardware speeds, and download speeds. Once the install is complete, click on "Restart Now", and follow the instructions.
You will be presented with a screen asking you to "Remove the Installation Medium, then press ENTER":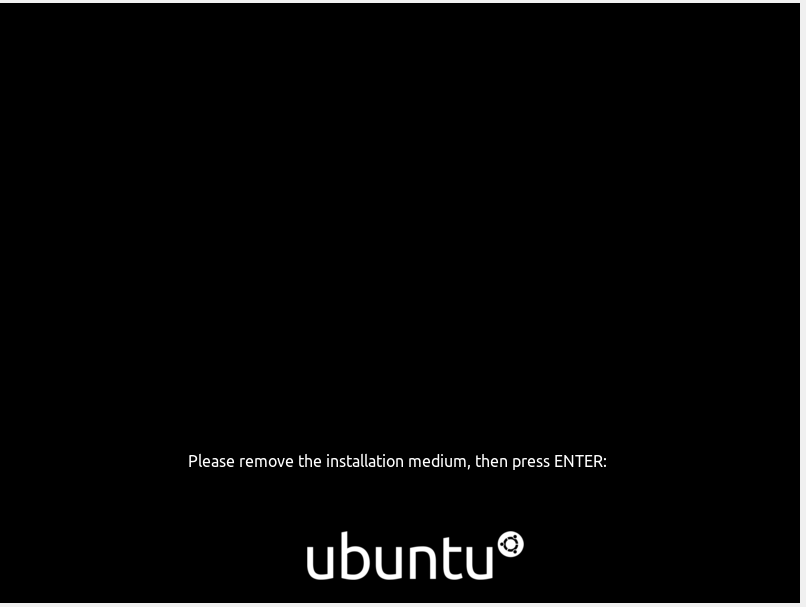
If you were doing the install to a physical computer, then this means that you need to unplug the USB drive from the computer, and press the "Enter" key on the keyboard. If you were doing the VM install, just press "Enter" on the keyboard to continue.
Your system should reboot, and you should be loaded into Ubuntu. Enter your credentials if necessary to get logged in.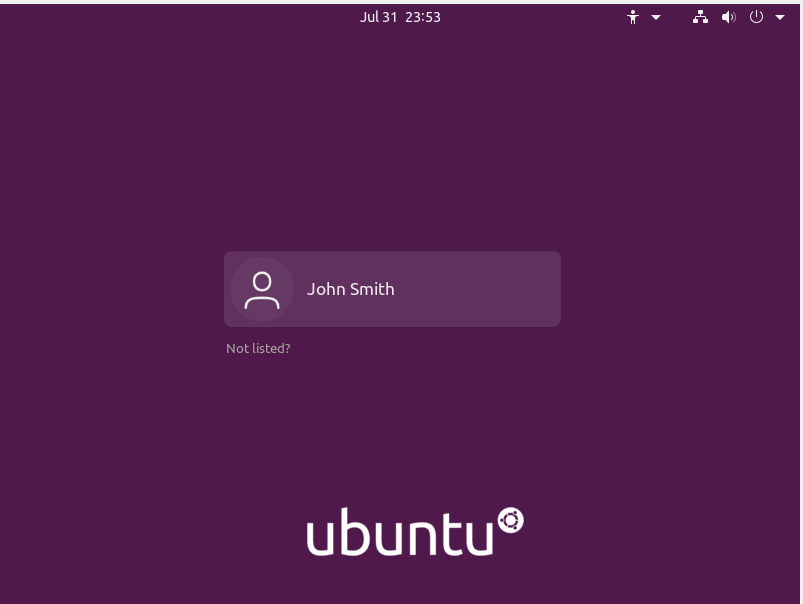
NEXT STEPS
Now that you have Ubuntu installed, and you are logged in, what's next? First, you will be presented with a window designed to help you get setup. It will ask if you want to connect any accounts with your new Ubuntu install. You can go through any of this if you would like, I will just be skipping it now using the button in the top right corner.
Next you will be asked to setup Canonical Livepatch. This is a security service that allows for updates that would normally require restarts, to be installed without the restart. It is a super cool service, but does require that you have an Ubuntu One account. I don't currently have one setup, and since this is just a testing system, I'm not going to bother with it at this time, but if you were setting up a permanent workstation for yourself, I would definitely recommend getting this setup, as it would save a bunch of time later, and increase security (which is never a bad thing). I will just click "Next" in the top right for now.
The next page is just asking if you would like to send any system info to Canonical (the company behind Ubuntu) for them to use to improve Ubuntu in the future. Select whatever you feel comfortable with here, and click on "Next" in the top right.
Choose whether or not you want to enable Location Services, and click on "Next" in the top right.
Now you are done with the first run setup. There is a little message letting you know that you can open the "Software" app to install more software if you would like. Click "Done" in the top right.
You may have an update available after this (I did). You can choose to run it now, or later.
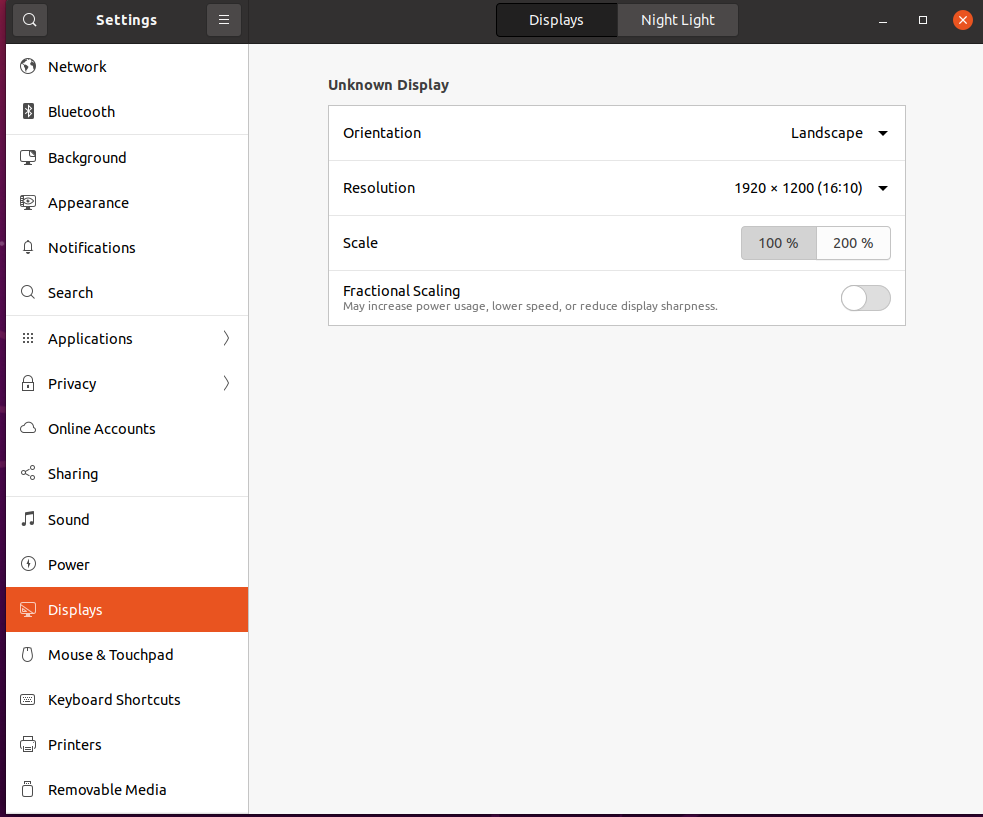
You may also notice that you have a poor screen resolution (this will vary from install to install, depending on hardware, etc). You can try going to the settings and increasing your screen resolution as a first step.
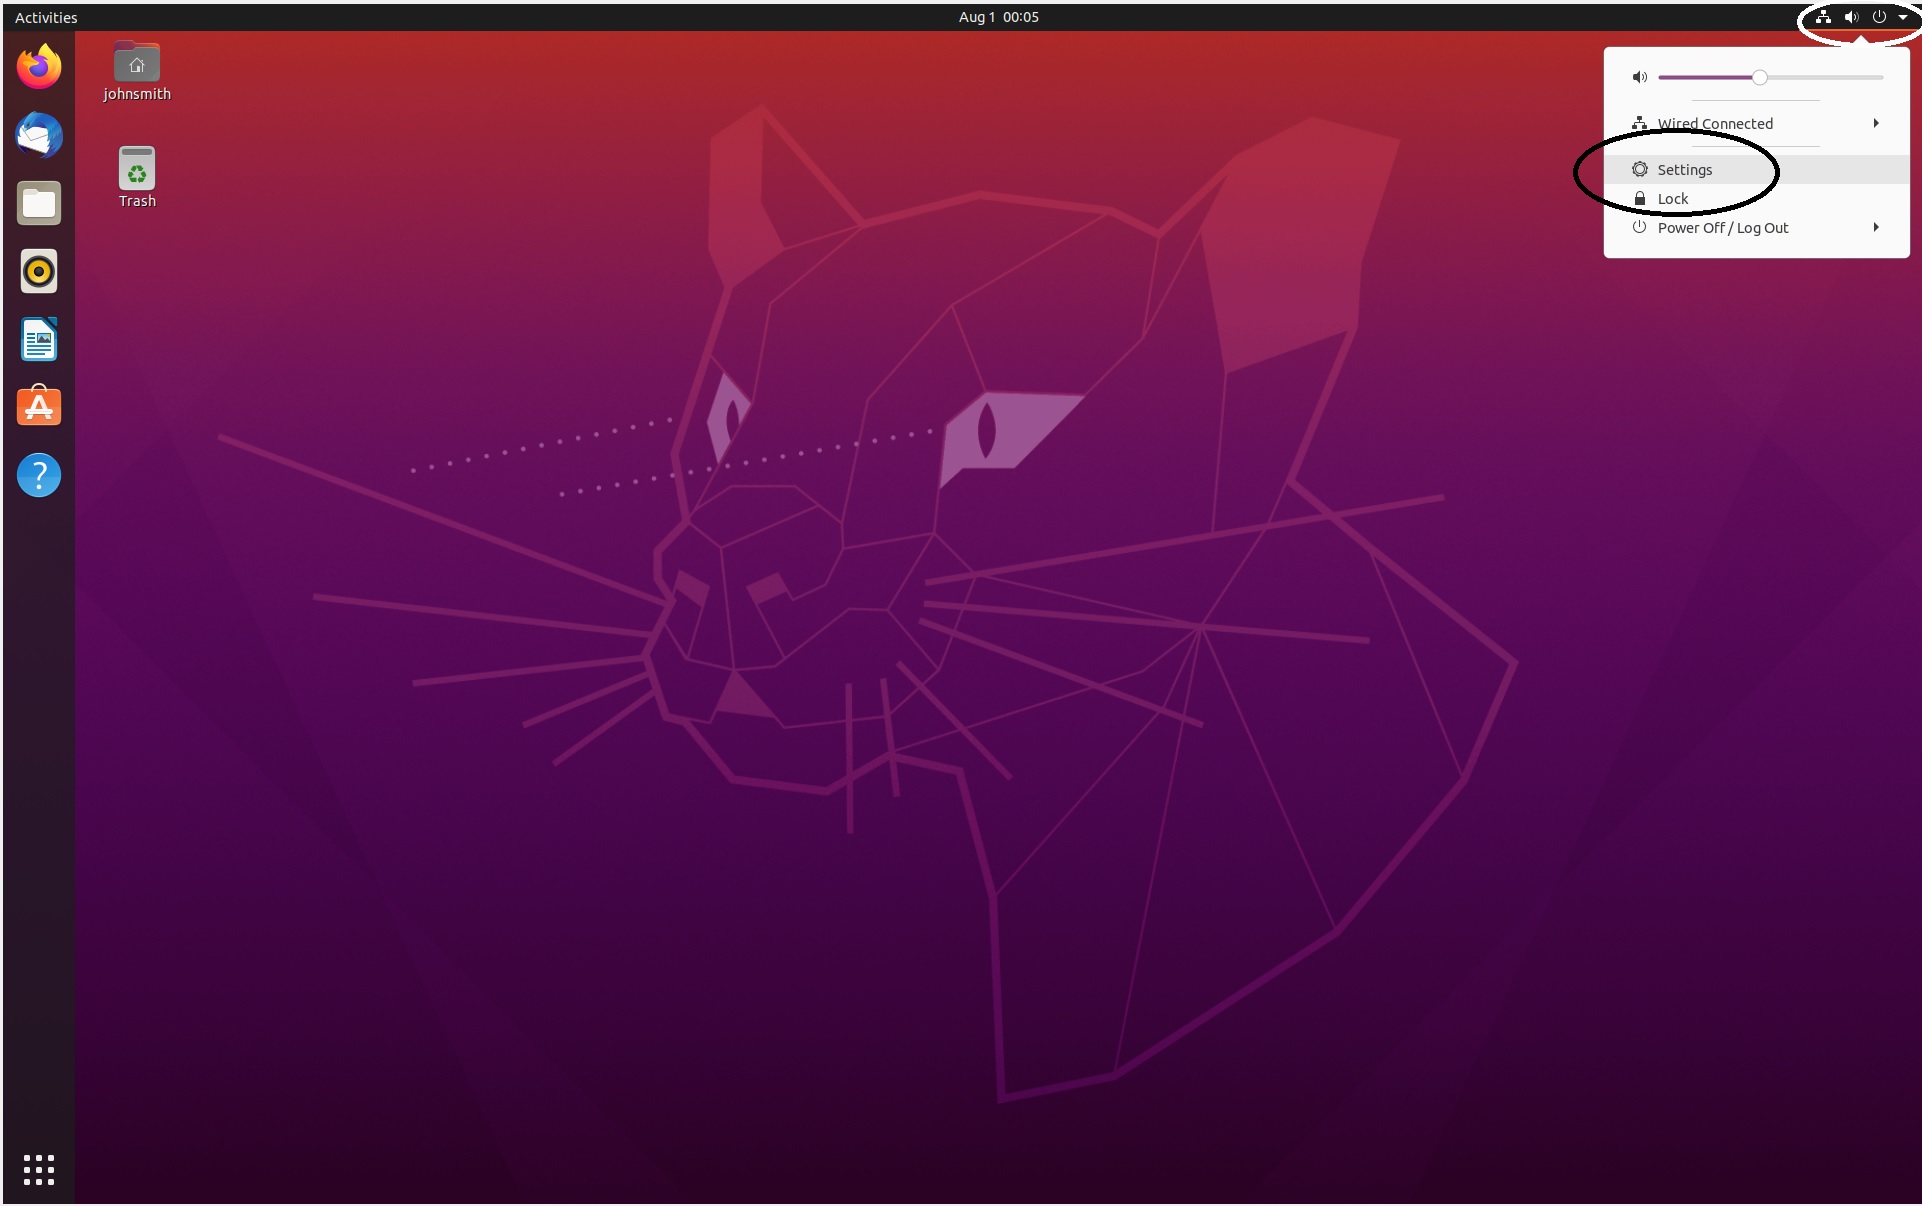
- Click on the dropdown arrow at the top right of you screen, then click on Settings:
- Find "Displays" on the left hand side of your settings window, then adjust the "Resolution" on the right side to a better value (Most modern displays are 1920x1080 or 1920x1200, with some exceptions):
If you don't have other resolution options, there are some things you can try.
PHYSICAL COMPUTER RESOLUTION FIXES
Chances are that you need to install drivers. Ubuntu has a handy tool for this, provided that there is a Linux graphics driver for your hardware:
- Click on the grid of squares in the bottom left corner to open the application launcher menu, and open the "Additional Drivers" app from the menu (should be first in the menu):
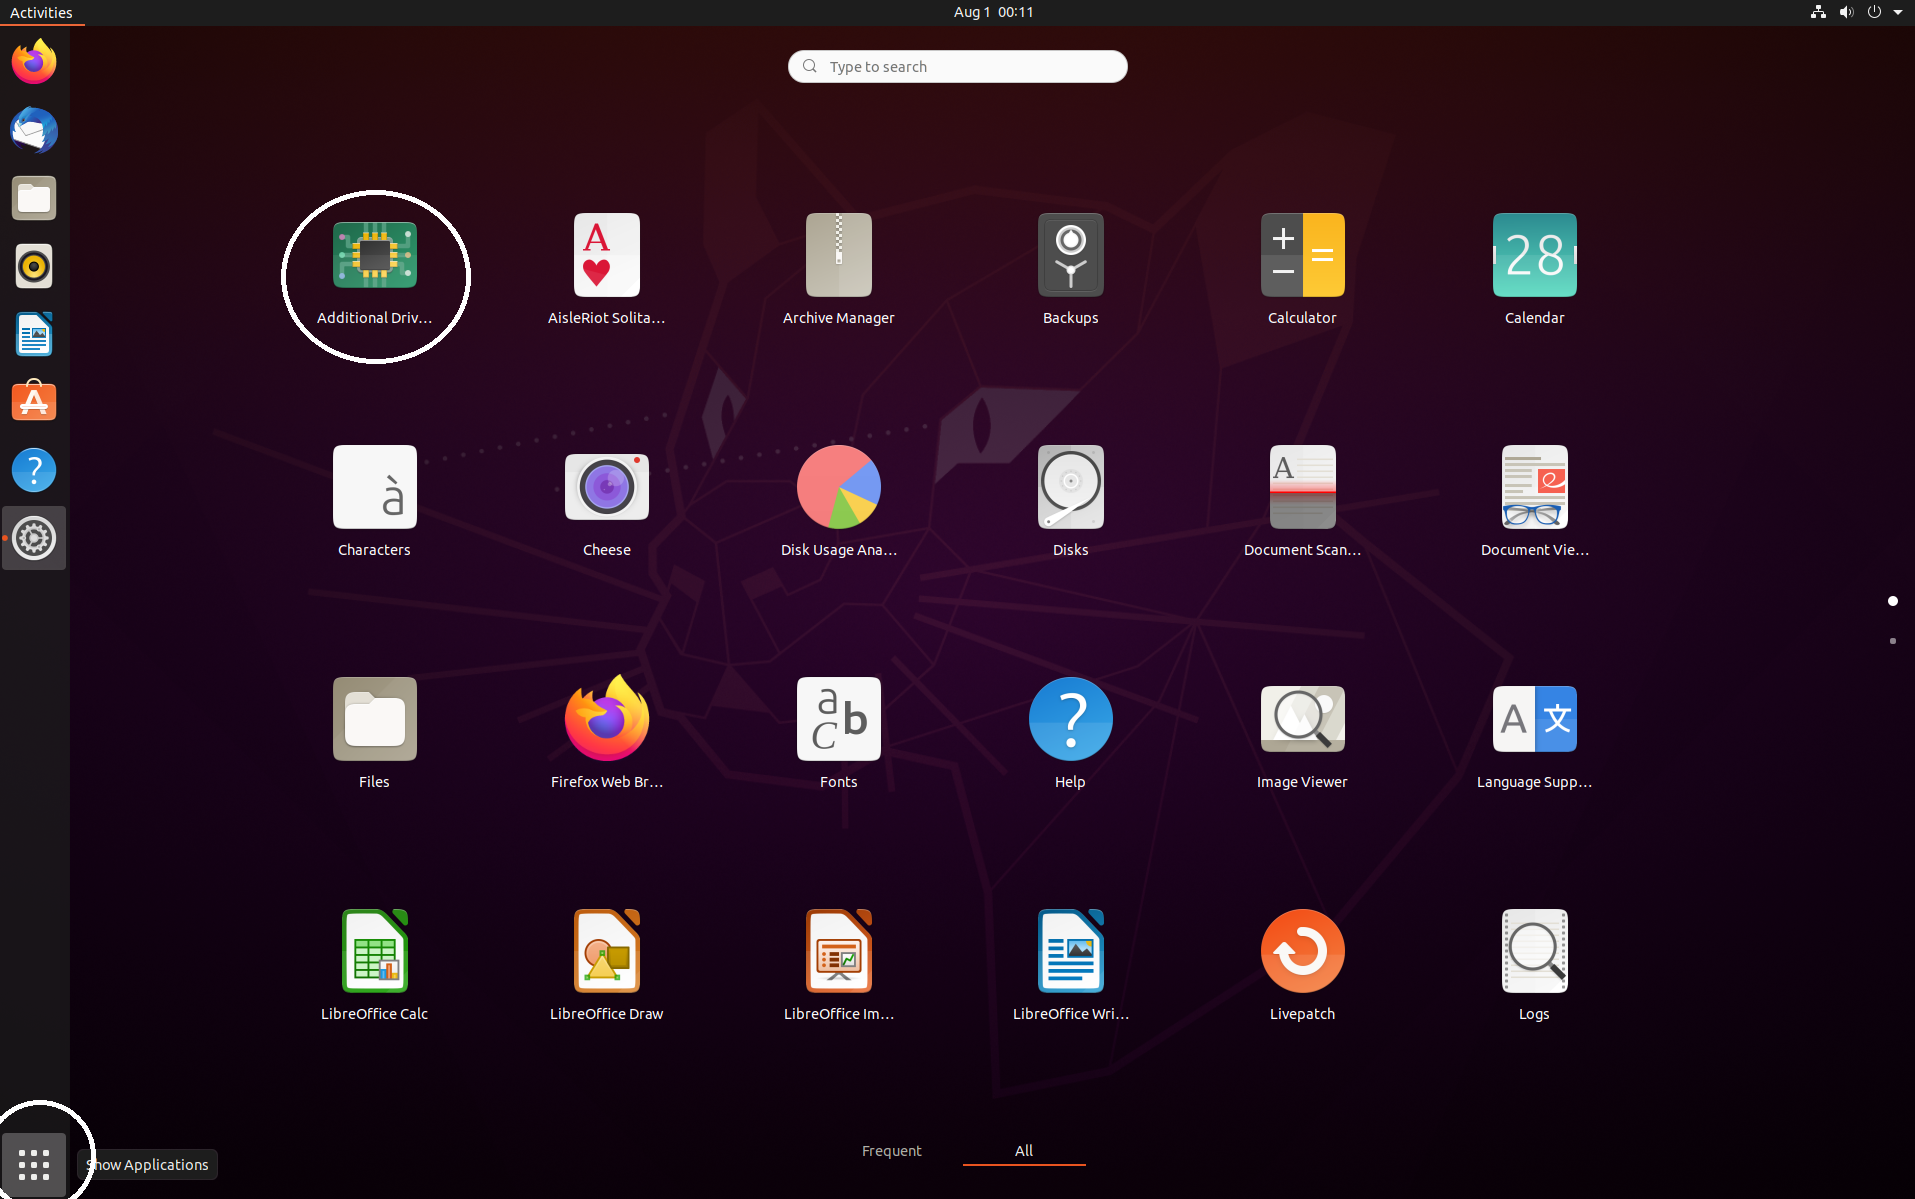
This should show you any hardware that there are drivers available for, and allow you to select them to use them. If you have any in this list, select the option for the driver that you want (it will be a graphics driver needed to fix the resolution), and click on "Apply Changes". Sometimes, this can cause other issues, so make these changes at your own risk. If you still aren't able to fix the issue, you will probably need to turn to Google for assistance. This is less common these days, as Ubuntu and Linux have come a long way to making the experience pretty easy on just about every system.
VM RESOLUTION FIXES
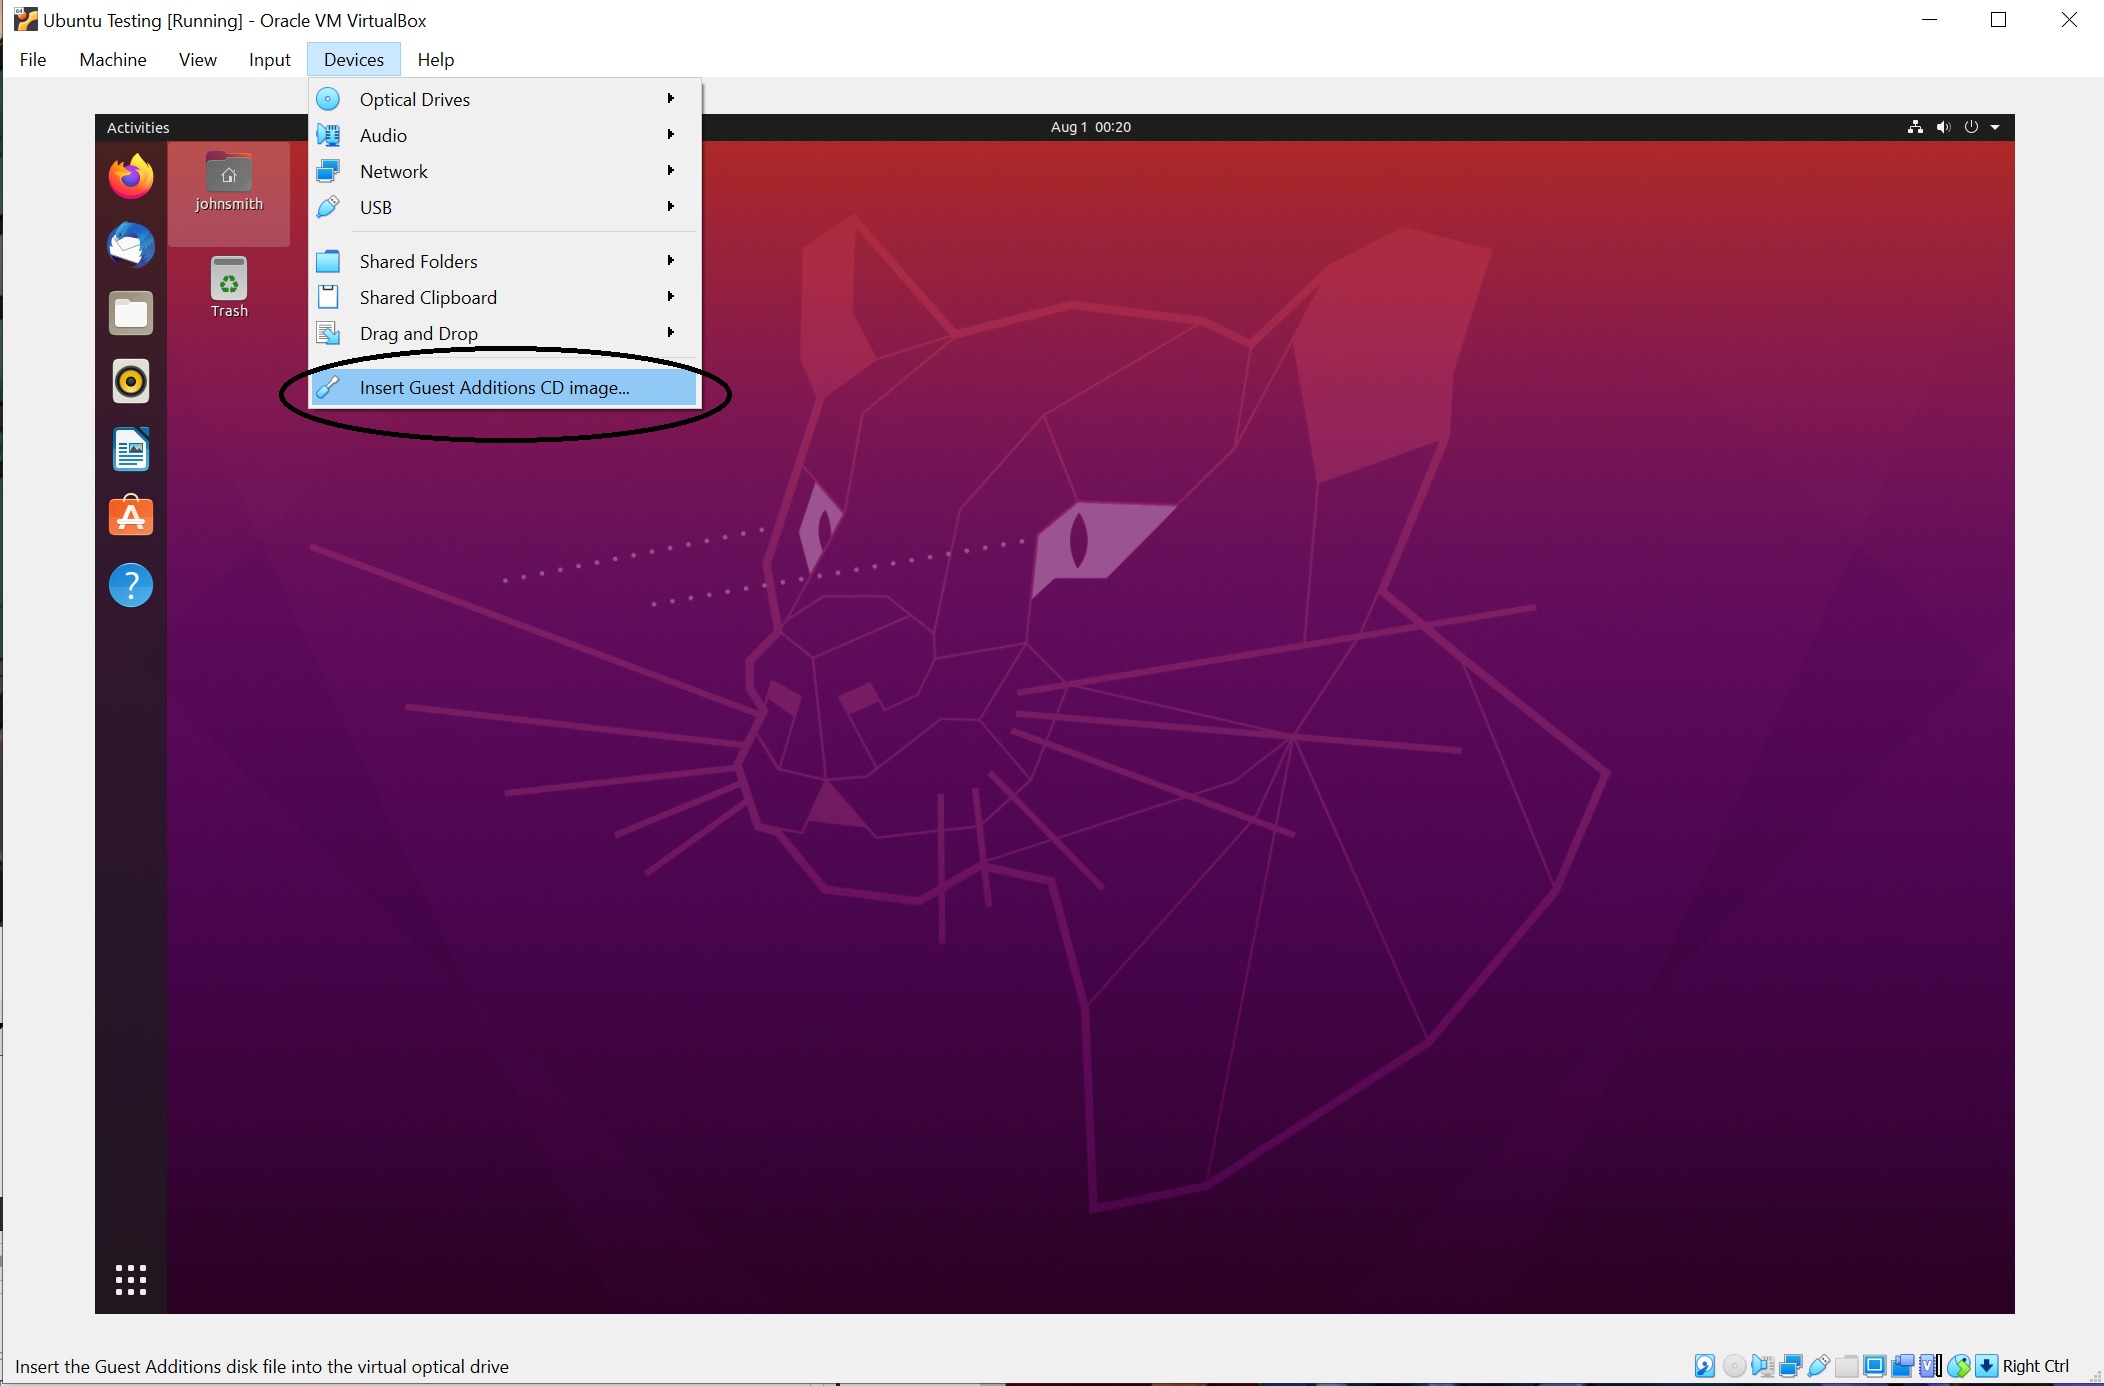
If you installed using VirtualBox, one thing you will probably want to do straight away, is install the VirtualBox Guest Additions. This is a set of drivers and firmware that allow the VM to perform much better with VirtualBox. To do this:
- Go to the "Devices" menu at the top of the VM window, and click on "Insert Guest Additions CD Image":
Wait a few seconds, and you should be prompted to run the software from the CD Image:
- Click on "Run", provide your password when prompted, and wait until the install is complete. When you see "Press Return to close this window..." in the prompt, press "Enter' on the keyboard, and after the prompt closes, restart your VM by going to the dropdown at the top right of the screen, selecting "Power Off/Log Out", and then "Power Off". A window will popup asking what you want to do, select "Restart" to restart the system.

That should be it! You should now be able to adjust your resolution.
Now that you have things installed, play around with your new OS. Ubuntu has some pretty cool features, and also has a very nice look and feel to it. You may still not be to the place where all of your day to day tasks can be done on Linux, but it's getting close. There is still some proprietary software out there for Windows and MacOS that binds users to those specific operating systems, but Linux has come a LONG way since I started using it back in 2007, and it's really impressive to see just how viable it has become as an every day use operating system for non tech-savvy individuals.
I encourage you to go out and check out other Linux Distributions as well. The same install process should work for most distributions. Many of them are just as user friendly as Ubuntu, some even more so. Some that I would recommend are:
- Linux Mint: Linux Mint is designed with the Microsoft Windows user in mind, and laid out A LOT like Windows. It is fast, with a TON of supported software, and a very active user base.
- Kubuntu: Kubuntu is the same underlying OS as Ubuntu, but with the KDE desktop environment. This can make it feel a bit more like Windows, but with that same Ubuntu greatness.
- Elementary OS: Elementary OS is designed for Apple MacOS users. It is VERY similar to MacOS in look, and feel. It's fast, and easy to use.
- UbuntuDDE: UbuntuDDE is just Ubuntu, but with the DDE desktop environment (which is BEAUTIFUL).
There are a TON of Linux distributions out there, and each one offers something special. It might take you some time before you find the one that fits just right for you. I have installed and used every major one, and a lot of minor ones, over the years. Personally, I keep coming back to Kubuntu. There's just something about the flexibility of Ubuntu with the power of the KDE desktop that I can't get away from.
WRITTEN BY: MICAH ROBICHAUX
 Admin
Admin 